What Does ‘Cupped Harp’ Mean?
‘Work your hands from day to day, The winds will blow the profit.’ Louis MacNiece
It all boils down to what you do with your hands. When playing acoustically, there are two principal hand positions – open and closed. Harp players also call the closed position ‘cupped’. The term ‘cupped’ probably derives from the way we would naturally use our hands to scoop and hold drinking water.
When playing amplified harmonica there are three further scenarios that need consideration; the way we use our hands changes in each case. The first scenario is playing semi-acoustically through a vocal microphone (mic). The second is playing with an open hand position through a hand held mic. The third is playing with cupped hands through a hand held mic. (The hand held mic can be either the vocal mic or a separate harp mic). Let’s look at all the options in greater depth.
Acoustic Harp: Open hand hold
This is when you hold the harp in a natural and relaxed way with (one hand, or) both hands. The important point is there is nothing covering (cupping) the back of the harp; the sound produced is the natural voice of the harp. Our hands also create a shortened trumpet cone, which allows us to project our playing. Any tonal or articulated effects are provided by the player from behind the instrument without any hand movement.
Acoustic Harp: Cupped hand hold
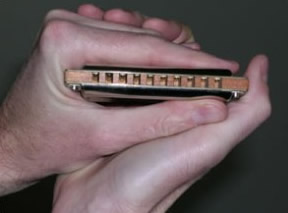
 This is when we use both hands to create an airtight chamber around the harp. It actually amplifies the sound and gives it a warmer tone. In terms of physics, we are harnessing waveforms and using them to our advantage. The image (left) illustrates the cupped hand hold for acoustic harp playing.
By lifting one or more fingers on the left hand, opening the right hand alone, or throwing both hands open together, we can produce the well known ‘wah-wah’ effect. The vocal equivalent would be an alternation between a closed ‘mmm’ (or hum) and an open ‘aaah’. On the harp however, our hand movement adds an interim ‘www’ sound to the mix. Repeated slowly, the result is a ‘mwah-mwah’ sound. Accelerated, this becomes the straight ‘wah-wah’. Reducing this process to one rapid opening (or ‘throw’) of the hands and a symultaneous attack on the reed makes the harp ‘bark’.
A related effect is the hand vibrato – the ‘campfire’ sound. This is produced by rapidly fluttering the outermost hand as we play, normally with the fingers extended vertically, although you could also use a cupped, semi-cupped or open hand hold.
Semi-Acoustic Harp
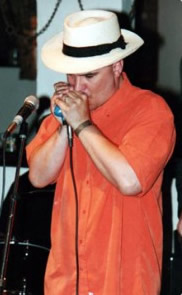
This is when you direct the above options through a standard vocal mic. Practice is needed to find the optimum posture or mic angle to catch all your special hand effects. The important point is you are free to change between harp playing and singing using the same mic. Bear in mind you would not normally touch the mic and it is always a good idea to sound check the vocal and harp levels before you start. This will ensure your harp sound is picked up clearly and there is no feedback. Much of Sonny Boy Williamson II’s recordings and performances used this technique.
Amplified Harp: Open hand held mic
This marks the transition from acoustic or semi-acoustic playing, to full on power harping. Working a mic is a skill in itself and you will find your range of hand effects is more restricted. For open playing, you are holding the harp and mic in a relaxed grip and enjoying the harp’s raw amplified tones. These will sound thinner than a fully cupped mic, but when the two options are used alternately, they offer a great deal of light and shade. The start of Whammer Jammer (Magic Dick/J.Geils Band) or Automatic (Lester Butler/Red Devils) are good examples of this switching technique. Either way, the focus of your playing is on the amplified sound qualities you are generating.
If you are using a free-standing vocal mic for voice and harp, my biggest piece of advice is never to move from semi-acoustic to hand held mic playing unless you have cleared this with the band (and sound engineer) beforehand. If you don’t, there is a real risk of damaging the sound equipment, deafening the audience with feedback and never being invited to play again. This advice comes to you straight from the school of hard knocks.
Better to have separate vocal and harp mics. But beware my next piece of advice. Although playing through a separate harp mic looks cool (you can walk the stage and stroll through the audience – which is where the name Wanderin’ Wilf originated), you won’t automatically sound like Little Walter. It doesn’t matter whether you have a bullet style mic, a regular vocal style mic or the best amp in the business, first you have to hone your playing skills au naturel (acoustically to you and me). Let’s put it another way, substandard acoustic skills sound ten times dodgier amped up.
Amplified Harp: Cupped hand held mic 
Let the party commence! If you have already taken the time to learn bends, octaves, scales, tone building, tongue blocking and articulation (amongst other things), you are well appointed to make the move into amplified harping.
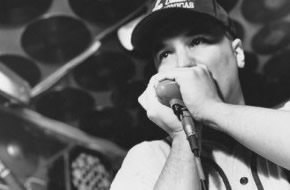
A cupped harp mic will allow you to go for that monster Chicago style crunch. Your focus is on tone. You want to drive your mic, overdrive your amp and pump your speakers. Proficiency in using the tongue block technique improves the tone still further. Incidentally, you will be able to achieve a semi wah-wah, but that’s about it for hand effects.
In my experience the ground rules start with holding your harp half an inch off the front of the mic, rather than touching it. Cupping your hands tightly around the harp and mic then creates a pressurised central air cushion which helps to work the mic. If you have a control pot on your harp mic, it should be wide open to allow maximum signal to your amp. The second stage is to adjust your amp settings so the valves are being overdriven. Full Bass frequency, a little Mid and no High (or ‘Top’). Experiment with the volume and gain settings for the best balance and crunch.
I will save wider discussion on the best amps to use, together with any customisation, for another post. Briefly, the majority of players would advocate a valve (or ‘tube’) amp. Often this is a Fender 59 Bassman or a Fender Twin Reverb. Of course it could also be solid state. I recently saw Billy Branch in Chicago playing through a solid state Pevey guitar amp and he sounded fabulous.
As for harp mics, most players would opt for a bullet style mic – the Shure Green Bullet, Hohner Blues Blaster or Astatic JT30 are typical examples. But again this is not obligatory and there are plenty of alternatives. Along with his solid state Pevey amp, Billy Branch was using an unusual ‘stick’ style mic.
There are two other finer technical details that may help with your overall tone. A high or low impedence lead for your mic is one. The other is whether you would benefit from playing your mic through a delay pedal (digital or analogue) for that retro, slap-back effect.
Ultimately you should feel free to experiment with whatever equipment is available and within your budget. Little Walter would have done. But at the risk of becoming a nag-box, get your chops in first!
Before I close, one last piece of advice if you are playing a gig with monitor speakers along the front of the stage or performance area and using a dedicated hand held harp mic. Avoid dropping the mic down by your side in between playing. Especially if it’s a bullet mic. It will probably be pointing at the monitors and the resulting feedback will have the audience, band and sound engineer diving for cover. This piece of advice also comes to you direct from the school of hard knocks.
And finally
Talking of experimentation, you can literally cup the harp by playing it into a hand-held pint jug, glass or cup and messing around with the natural resonances. It may feel a bit awkward at first, but once you get the hang of it, it can be a lot of fun. And it’s free – assuming someone else paid for your drink. Using a pint pot at a gig is a real crowd pleaser and not something you get to see very often. Try it!

